Night Shots and Lighting: Go Natural
The Christmas season provides ample opportunity for outdoor night shots. Capturing your images with natural light makes for fabulous results. The challenge is knowing how to do it to get the results you want.
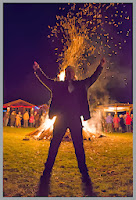
Every year various groups from Mayne Island pull together and host a Christmas Eve bonfire celebration. The evening is characterized with a huge bonfire, a giant tree filled with bright Christmas lights, warm drinks and the singing of Christmas carols. For photographers, the challenge is to capture the mood of the night with an image.
Here are the things to consider.
1. Turn off your flash. With the shot you see here the flash will make no difference to your image except light the foreground (the people are just too far away). As well, in most cases, the auto setting on your camera will result in a very fast shutter exposing the lights and fire properly but the people will most likely be too dark. By turning off your flash you camera's auto setting will take a longer exposure.
2. Use a tripod. With a slow shutter speed, no one can hold their camera steady enough to prevent camera shake. As you can see in this image, everything is blurry. Not only that, the camera took a picture that is missing all the beautiful detail (compare the results to the one above). Using a tripod will allow you to take a longer exposure capturing all the sweet details without blur.
3. Use MANUAL mode. If you know how to do this, set your camera on MANUAL and experiment with your settings until you get the results you want. That's what I do ... and I am a professional! Back in the film days you had to use a light meter and figure this all out. Now you can just preview your shots.
If you don't know how to use MANUAL mode, find the "+" & "-" controls on your camera ... by pressing on the "+", you can take longer exposures on AUTO mode. Again, experiment!
4. Use your timer or a remote shutter cord. To prevent camera shake (the motion caused by pressing the shutter button), use your camera timer or a remote shutter release cord to take you picture. You would be surprised at how much shake is created by simply pressing the shutter button.
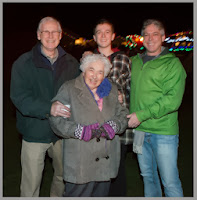
5. HIGH ISO. If you are shooting hand held, use a very high ISO (this refers to how fast you camera can capture an image ... the higher the number, the less time you need to capture an image). Here I am with my step-kids hand-holding my camera as steady as I can. ISO was 8000 (very high) and my shutter speed was 1/25 ... as slow as I possibly could without a tripod. Notice that we are well lit by the fire however the christmas tree has lost it light. Always check your image by zooming in on it on the back of your camera ... you have to zoom in to see if there is blur.
6. Use your flash. There are times where you just need to use your flash. The picture on the right would need a flash to get a properly exposed image (mind you, that was not what we wanted). The folks on the left were just too far away from the fire so a flash was needed. Notice how the background is just totally dark. This was not a problem as the meaning of the image was simply recording the event for the family.
7. Bounce your flash where possible. If you have a flash where you can adjust where it points, and if you have something to bounce it off, point it up. With this image, Santa was sitting under a white canopy. By pointing the flash up, the bounce off the canopy lit everyone mostly from the top down resulting in delightful shadows (something I like). In fact, if you have a SLR, purchase a cord the allows you to hold the flash in your hand enabling you to point it at reflective surfaces creating interesting and pleasant lighting effects. Below is a second example where the flash was bounced off the wooden ceiling, thus the warm tones on their faces, and the shutter was slow enough to capture the tree in the background.
So, there you go. The message here is experiment! Effective lighting is key to interesting and inviting pictures. If you want to learn more and live on Mayne Island, I will be running my course "How to turn your snapshots into photographs" later this winter.
Stay tuned.
Toby


