Friday, November 27, 2020

How to make the "usual", "unusual".

Making the usual, unusual.

How often do Gulf Islanders ride the ferry? Too much. How long does it take before the unique marine adventure become but a backdrop to one's life? About 10 trips. So, it isn't long before the "unique" becomes "blasé" ... at least to some.

With my frequent trips to Victoria and Vancouver, it wasn't long before I found myself joining the "blasé" group. Fortunately I am rather an "active" personality with an insatiable interest in capturing images. So, what a better way to re-familiarize me with my ferry trips than to begin to look at it from a different point of view.

"The Ferry: A different point of view" is the result of my curiosity. I started to look a the ferry as a piece of art - to look at the ferry trip (sunsets, wake, etc.) as recordable memory moments. Essentially, I started to capture what had become "usual" in an "unusual" way. 

Here are the original images transformed using HDR software. Sold a few of these. Unfortunately, after 27 years of riding the ferry, I practice my bass guitar now instead of roaming for interesting images.


Don't dump the bad image is it makes a statement for you.

While in India, I came across a truck full of people all jammed in together. It was an iconic image of transportation in India. However, the resulting image just did't cut it for me. I rarely delete rather save and experiment.

Here is the original image.


You get the  idea of "compressed" but it just didn't have punch. From my point of view there was no need for colour ... it was all about shape. So I used post-processing .. some single image  HDR EFX pro and Silver EFX Pro to make the statement I saw.


Does it work for you? You see, others don't necessarily see what you see. If you have an image that you think is "significant", show it so someone and ask them "what is this image all about? If they don't come up with what you want them to see, you will either need to re-shoot (which I could not do) or work in post processing. 

Have fun and experiment.

Thursday, December 26, 2013

Night Shots and Lighting: Go Natural
The Christmas season provides ample opportunity for outdoor night shots. Capturing your images with natural light makes for fabulous results. The challenge is knowing how to do it to get the results you want.

Every year various groups from Mayne Island pull together and host a Christmas Eve bonfire celebration. The evening is characterized with a huge bonfire, a giant tree filled with bright Christmas lights, warm drinks and the singing of Christmas carols. For photographers, the challenge is to capture the mood of the night with an image.
Here are the things to consider.

1. Turn off your flash. With the shot you see here the flash will make no difference to your image except light the foreground (the people are just too far away). As well, in most cases, the auto setting on your camera will result in a very fast shutter exposing the lights and fire properly but the people will most likely be too dark. By turning off your flash you camera's auto setting will take a longer exposure.


2. Use a tripod.
With a slow shutter speed, no one can hold their camera steady enough to prevent camera shake. As you can see in this image, everything is blurry. Not only that, the camera took a picture that is missing all the beautiful detail (compare the results to the one above). Using a tripod will allow you to take a longer exposure capturing all the sweet details without blur. 

3. Use MANUAL mode. If you know how to do this, set your camera on MANUAL and experiment with your settings until you get the results you want. That's what I do ... and I am a professional! Back in the film days you had to use a light meter and figure this all out. Now you can just preview your shots.
If you don't know how to use MANUAL mode, find the "+" &  "-" controls on your camera ... by pressing on the "+", you can take longer exposures on AUTO mode. Again, experiment!

4. Use your timer or a remote shutter cord. To prevent camera shake (the motion caused by pressing the shutter button), use your camera timer or a remote shutter release cord to take you picture. You would be surprised at how much shake is created by simply pressing the shutter button.


5. HIGH ISO.  If you are shooting hand held, use a very high ISO (this refers to how fast you camera can capture an image ... the higher the number, the less time you need to capture an image). Here I am with my step-kids hand-holding my camera as steady as I can. ISO was 8000 (very high) and my shutter speed was 1/25 ... as slow as I possibly could without a tripod. Notice that we are well lit by the fire however the christmas tree has lost it light. Always check your image by zooming in on it on the back of your camera ... you have to zoom in to see if there is blur.


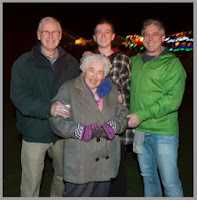
6. Use your flash. There are times where you just need to use your flash. The picture on the right would need a flash to get a properly exposed image (mind you, that was not what we wanted). The folks on the left were just too far away from the fire so a flash was needed. Notice how the background is just totally dark. This was not a problem as the meaning of the image was simply recording the event for the family.


7. Bounce your flash where possible.
  If you have a flash where you can adjust where it points, and if you have something to bounce it off, point it up. With this image, Santa was sitting under a white canopy. By pointing the flash up, the bounce off the canopy lit everyone mostly from the top down resulting in delightful shadows (something I like). In fact, if you have a SLR, purchase a cord the allows you to hold the flash in your hand enabling you to point it at reflective surfaces creating interesting and pleasant lighting effects. Below is a second example where the flash was bounced off the wooden ceiling, thus the warm tones on their faces, and the shutter was slow enough to capture the tree in the background.


So, there you go. The message here is experiment! Effective lighting is key to interesting and inviting pictures. If you want to learn more and live on Mayne Island, I will be running my course "How to turn your snapshots into photographs" later this winter.
Stay tuned.
Toby


Monday, November 26, 2012

Product Photography: How to hang a shirt in mid air

This week I was asked to take some images for a company that manufactures and sells kids shirts - very green shirts. Green in that their product is environmentally smack on and portions of their sales go to a good cause - endangered species protection. But, that is not the point of this blog. Rather, it is about how to create images of shirts with no background and with no one in it.
I am a generalist as a photographer. Living on a small island I end up doing everything from soft news to light commercial shoots like this one. I have never had to make a shirt hang in mid air but I was up to trying. Here is what I did.
First, you need a mannequin - something to put the shirt on (since you aren't using a kid). My contractor was in the clothing business, had connections and came up with one. He painted it white to prevent colour leakage though the material.
With the shirt on, it was a bit loose so I used a clothes pin on the back to smooth it out. If you want the natural look, don't pin it. Alternatively, you could lay it on white foam on the ground and do you best to shoot it at a true 90' to the shirt (you don't want distortion).
Next was the lighting. The trick here is to use a white background and light is separately from the shirt. I used a large white reflector to achieve this (you can see the large white disk behind the mannequin  in the first picture). As well, I used two soft boxes to light the set. I put a grid on the one lighting background to prevent it from spraying light on the side of the shirt. A second light box was set back to light the shirt. To reduce shadows, I placed a white reflector on the opposite side to create fill light. You could also use a second soft box on the opposite side to totally balance the light. As well, I over lit the background by 3 stops to make sure any wrinkles on the material were washed out.
So as not to create distortion, I used a 70-200 mm lens and shot from about 10 feet away. It worked great.
Notice the cover on the pool table - a white sheet. You want to make sure you do not add any extraneous colour. Fortunately the room was painted white but the pool table top was green. The sheet did the job.
Use test shots to check for light balance then adjust the strobes output until the lighting on backdrop is washed out (more light shining on it) and the shirt is properly exposed. (I shoot tethered to my computer so I can see the results right a way on a large screen.)You can see a bit of the background texture but that will be easy to photoshop out.
Next you want to remove unwanted bumps and dips. Note the one on the middle right (bump) and the dint on the middle left. Using the "liquify" filter in Photoshop CS6 they are easy to remove. (With this filter you can also erase those fat extrusion on pictures of people you like.)
I could have done a lot more work here but these were just test pictures. But you can see what a difference it makes, especially on the right side.
Finally you need to get rid of the mannequin. Again, CS6 will do it with the selection tool and some fine tuning. Here is the final product. Pretty cool, right?
Here is a final re-shoot without the shirt being clipped and with two soft boxes as the key light. I have also reduced the exposure to bring out the rich colors. Always changes.


Well, I hope you both find this interesting and that it encourages you to push you own photographic expertise. Whether it is a shirt or a product you are trying to sell on Craigslist, presentation means everything. Give it a try.
Cheers.
Toby

Wednesday, November 21, 2012


Considerations on How to Photograph a City: Chicago

If you are an amateur versus a "snap-shop" photographer you may be interested in experimenting with taking character images of the next city you visit. Yes, the "I was there" snap-shot such as your sweetheart in front of a famous structure is a fun record to prove to others you were there but you can go beyond that. 
Often the extra shots are simply wide angle street shots trying to get everything into one image. Ok, do take those as it will give folk a sense of the city setting and general layout. But I encourage you to consider spending some time thinking "what is this city all about" either in the nature of the structures, transportation, or other dominate features. I had this opportunity during my first visit to Chicago. 
On my arrival, nothing stood out for me - all I saw was the typical urban sprawl. However, as we approached the city four things got my attention: stunning high-rises, rusty bridges, old character buildings, and an inter-city river/canal. Now, I didn't shun my partner and hosts and run off taking pictures. Rather I simply focused on those four factors as we toured the city. Mind you, there were special moments where I needed a little extra time to get the right shot. (Viewing note: Click on any image for a larger view.)
1. Context. First, give folks a context for your images. As you can see, my first image (above) is a panorama of the city. I chose a location that would demonstrate the essence of the city - a multitude of stunning tall structures. 
2. Reflections.  Often buildings are so condensed that it is difficult to capture groupings of them. My second image is a similar shot but taken within the city capturing some of those same buildings but from a reflection of one of them. Note that I took it at an angle. This creates some drama in a potentially static image.
3. Look up. To accentuate the height of the structures, use a wide angel and point up. Don't forget to fill the frame with the building leaving only a little sky. In this case, the parallax (converging lines) caused by looking up creates the visual drama. Seen in a larger size, one can almost experience vertigo ... just what I want. These building are tall.
4. Structural artifacts. Rust is endemic to Chicago. It is an old city surrounded by water and rust is a natural consequence. Whether it is the rapid transit rail system or the bridges, the rust jumped out at you. With this image I chose to take a tight shot of the control booth adjacent to a lift-bridge as I wanted to make a statement about the rust, not the bridge.
5. Different point of view. The city is full of bridges - steel gridded bridges. Though I could have taken a telephoto shot down the river with one bridge in the front and several more in the background (out of focus), for my first image I chose to be on the bridge with the city peering though the bridge structure. Hopefully you get the feeling that there are lots of bridges nestled right in the middle of the city.
For my second image I chose a graphic point of view. This one was captured while going under a bridge on the "River Cruise". I didn't pre-visualized taking this one, rather, it jumped out at me while on the cruise. This was the third bridge we went under. It took me that long to think what image may work and to select my lens and adjust my camera settings. Notice again the off angle point of view. I used a fish-eye lens that caused the bending and the expansive view (the bridge was very close and therefore, demanded a extremely wide angle point of view). Also note the sun in the lower right that added some drama and created wonderful shadows.
6. The Old. One of older buildings in Chicago is The Merchandise Mart. Pictures of it are a dime a dozen so I wanted to try something different. This image was also shot from the river. I chose a dramatic angle filling 3/4 of the image with the building and the rest with only sky ... i.e., no other building. I liked the contrast between the parallelograms on the building and the numerous small, puffy clouds in the sky. 
7. Iconic Buildings. 
Now you can't think of chicago without thinking of Donald Trump - not that I want to. However, the size if his ego is reflected in the structure he built in the heart of the city. I chose to capture his building in the context of the city. It is positioned amongst the old structures (see the city hall on the right) and in full view coming from the south arm of the river. He has definitely made a statement.
Summary. These are just a few of the images I captured during my trip. I encourage you to experiment with making your own statement about the cities you visit. First consider, "What is the essential character of this city to me?" Secondly, "How can I capture it in an interesting and visually dramatic fashion?" Do this to please yourself; You are the artist and are making a statement. But, of course, take a few "snapshots" to please those who have more basic photographic tastes. 
And here is my final image. Do you get the feeling of the city's structures?

Tuesday, September 11, 2012

Photographing Landmarks and Historic Sites.
It is almost impossible not to be motivated to capture images of structures associated with special places while traveling. Whether it be a church, monument, lighthouse, or civic building, one almost has to line up behind others to record that special place. However, when you get home the image often just looks like either a "what-the-heck-went-wrong-with-this-picture" picture or a cliché, postcard type image. With the former image, you best take a basic photography course. With the latter problem all you need to do is get creative and think outside the box. I will use Mayne Island's Lighthouse Park as my example.

This first picture is, from my point of view, that cliché image. Nicely framed by the trees (top) and shadow (foreground) with the lighthouse structures placed a touch off centre. Yes, take that picture but don't stop there.
One way to think differently is to make your main subject a secondary part of the image by placing it in the context of the setting.
With this image I got down to the shore and just started to scout around. (Photography is a lot about discovery.) I noticed that we had some nice puffy clouds and a generous supply of driftwood so I used them to bracket the lighthouse. Notice, the lighthouse is only 1/5 of the image yet the story is still about the lighthouse. From a graphics point of view, the logs do draw your eyes up to the lighthouse and the clouds provide a nice cushion at the top.

In this next image (taken a year later) I explored the location again this time at low tide. From this location the seaweed provided a nice context for the lighthouse. The lighthouse is still only 1/5 of the image yet remains the subject. As well, notice how the seaweed draws your eye upwards towards the structures. Also, the clouds are present enough to make the sky a little more interesting. Another difference between the images is the sun - defused on the first image and strong and direct on the second. I like both.

With this third image, the tide was coming in but the point was yet to be covered by the ocean. Willing to get my feet wet, I ventured out as far as I could go to see how things looked. From my point of view, this was a horizontal image where as the previous two were vertical. By the way, I normally shoot both angles then decide later which perspective works best. Digital is cheap! The sun was coming from my right creating nice shadows and a dark blue sky. To make the foreground more interesting, I got low and waited for the waves to arrive (notice the white water on left side). Notice again, the lighthouse is but 1/5 of the image yet still the main subject.

My final image is one many of you may not like ... it is rather artsy! Remember, you can always delete but you can't capture later what you have passed up.
With this image I placed the lighthouse on the left with the sun right behind it and placed grass on the right to create some visual dynamics. (Don't you find your eye dancing between the grass and the tower?)
Well, there you have it. One lighthouse, five perspectives. Give it a try. The next time you find yourself in a special place, be creative with your image capture.
Let me know your thoughts.

www.tobysnelgrovephotography.com

Thursday, September 6, 2012

Photographing Birds.
Who doesn't like birds? There is something magical about them. Many are cute and others are majestic. 
I have spent a lot of time either watching or attempting to photograph birds and there are many challenges. For the amateur photographer, there are some things to consider.

1.  Blur: This is probably the biggest problem - stopping the action. With moving subjects, you need to be sure your camera is set on "S" or "T" or shutter priority. Also, there is an "Auto" setting on some cameras that display an icon of someone appearing to run. This setting assumes you are shooting something moving and will adjust the camera to maximize a quick shutter. Potential blur can be caused by two main things: degree of movement and focal length. 
  • Degree of movement: The faster things are moving in your frame, the greater the need for a high or quick shutter speed. If you pan with a moving object like a bird gliding, you solve part of the problem. However, if their wings are flapping, the blur problem is an issue again.
  • Focal length: The higher the focal length (the more you have zoomed out) the greater the probability camera shake will cause blur. Think of it this way; Hold a pencil as steady as you can while your hand is resting on a table. Now, try to do the same thing with your arm extended. The more your arm is extended, the more the pencil wiggles ... right? It is the same thing with our camera ... the longer the zoom, the greater the wiggle effect will show up as blur. This is something you don't notice while you are shooting but the results will show up on your print.
In the above picture the shutter had to stop the actions of the seagull's moving wings.

2. The Moment: This is the most artistic challenge - the moment you have captured. It just can't be a bird, it has to be a bird doing something interesting or looking interesting. With the seagull picture, he was coming into landing, wings out, and his head cocked. Interesting to me. In the second picture, this duck was attempting to save the life if its chicks. She did this by distracting an intrusive dog by pretending to be injured - flying down the canal dipping her wings in the water with each stroke. In this case, camera blur caused by low shutter speed (I didn't have time to set up properly) however the result worked, at least for me. Now the picture needs an explanation but it works.

This image my be more pleasing and one not needing an explanation. I studied the behaviour of the heron for a while noting how he moves around. What stood out for me was their landing; their wings become their air brakes and their landing gear is extended for the landing. This was the moment I wanted to capture.
3. Context: WIth moving birds, this can be a real challenge. The bird needs to be in a setting that focuses attention on it. With the eagle image, I had many where the background was distracting and or unpleasant. I had to admit that it took 2 hours of shooting before I captured both the bird in an interesting position and the background was complementary and not distracting. So, shoot a lot and pay attention to where the best shots may be captured.
When I found the oyster catcher, the bird was in an interesting context - sitting on the rocks - and in an interesting position - on one leg and looking at me from side to side. The problem was the background - the coast of Vancouver was intrusive. The solution, get low and shoot up. It worked, I think. With the heron picture above, it was the the grey sky that I was able to wash out and accentuate the bird.

So, best of luck with your bird pictures. I hope these tips have been helpful. Do comment if you have questions.