Tuesday, October 26, 2010

High Dynamic Range Photography (HDR) - What’s it all about.


HDR, or high dynamic range imaging or picture capture is a set of techniques that results in the photographer being able to record and display a greater dynamic range of luminance or light. Essentially, your pictures come alive with brilliant highlights and lots of information in the shadows.

This is accomplished by taking numerous pictures of the same scene but at different exposures. For example, you would take the first picture with the camera’s light meter indicating a proper exposure. Keeping the camera steady (normally while on a tripod) you would take a series of captures of the same scene over and under exposing the image. With advanced SLR cameras (I use a Nikon d-300) this is easily accomplished by using the “auto-bracket” mode. With this setting, the camera makes all the adjustments for you. If you have your camera on continuous shoot mode, the exposures can be captured in about a second or two. (My camera captures 7 images/second.) Make sure the camera is on aperture priority to prevent changes in depth of field. I will talk about this later, however, as the iris opens up, the depth of field becomes shallower and you do not want the depth of field to change. Let the shutter alter the exposure.


You can learn more about the technical side of HDR photography from Blake Rudis


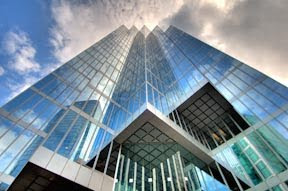
Here (above) is an example of one of my first HDR images

- CIBC building, Vancouver, BC.

It was the middle of a working day and I didn’t have a tripod. Here was my sequence:

I visualized the potential image and decided what lens I needed to use, how many exposures would be required, and what ASA setting I would need to ensure my slowest exposure would not result in camera shake.

Then I set my camera on aperture mode, ISO 200, 7 brackets, continuous exposure, put on my wide angle Nikon d12-24 and set it at 12mm. The point here is to be prepared well before your shot.

I placed myself just in front of the entrance where I could get a good tight image of the building with lots of parallax. Parallax is when a square or rectangular building looks wider at the bottom than the top. That was the look I wanted. HDR or not, your image must be a well crafted - framed properly, only relevant information in the frame (no heads of the people walking past me), and the information (subject of the image) arranged in an interesting fashion.

I took a deep breath, held it, planted my shoulders on my chest to stabilize my arms and camera (essentially making myself into a tripod), then took the 7 images in one second. I only used 6 of the images - you only need to use enough images that capture both the highlight (

sky) and shadow (awning)

information. Below are two of the images - the first one (1/6) captured the shadow detail and the other one (6/6) captured the highlight detail.


Back home I used Photomatix to process the images using their “tonal mapping” controls to shape the image the way I wanted others to see it. There you go and here is the result (top right0.

There is much more to HDR than what I have reviewed. Do check out Blake’s site for the nitty gritty of this advance in digital photography.


About the Images.

The first image is 6 stop different from the one below it. In all, I took 6 captures one stop apart. Notice how the sky is washed out in the first one and the awning is totally black in the other image. HDR software layers all the images and allows you to integrate information into one stunning image.

Sunday, October 17, 2010

Sidney Fine Art Show Award


For the second year, all three of my images submitted into the Sidney Fine Art Show accepted. A total of 338 pieces of art from sculpture to photographs were accepted from 1,200 submission. Their selection was based on excellence, creativity, originality, and technical achievement with an emphasis on artistic accomplishment.
But this year was to be more special than I imagined. Shortly after I received notice that I had been accepted into the show, I received a call inquiring as to whether I was planning on attending the opening ceremonies. Not long after that I received an e-mail asking permission to have one of my images used in their promotional publication. Clearly, something was up.
I will spare you the details except to say I won the "Show Designer's Award". Prizes are awarded for Best in Show, Best Work on Canvas or Board, Best Work on Paper or under Glass, and Best 3 Dimensional, as well as six Juror’s Choice Awards and the Show Designer Award.
As a photographer it was exceptionally pleasing to have an image successfully compete against oils, pastels, carvings, and tapestry. The message to all you photographers is "you can't win an award if you don't submit to a juried show" ... so submit.
The image that won, "Dead Wood", is a high dynamic range (HDR) capture of dead yet dramatic tree north east of the Salton Sea. It looks much more dramatic large (it was 28x38 in the show). For those of you that don't know, HDR is when you take numerous images of the same subject at different exposures thus capturing a "dynamic" range of light. The resulting images are often quite dramatic.

Now it is time to prepare for next year.

Saturday, September 18, 2010

Australian Competition Image to be Published


Photojournalism is my first love which made entering into the "2011 People and Plant: Social Justice and Environment Diary" a natural. Over 4000 images were submitted into this competition representing 82 countries and 1000 photographers. Only 54 were to be selected. Yes, I am one of them.

The picture that was selected is "Beachside Memorial", a memorial constructed monthly by Veterans for Peace on the sand adjacent to the Santa Monica Peer - a place where families come to participate in the rides and shops and just have fun. I was struck by the juxtaposition of the two celebrations - life and death.
To accentuate the experience, I used a fisheye lens to draw attention to the coffins and high dynamic range (HDR) to create a sense of the coffins being lit from above. In a later blog I will discuss the use of different focal lengths of lenses and in an earlier one I have already discussed HDR photography.
I was delighted to get the news. Though this image was displayed on National Geographic's web site earlier this year, to have it in print in a socially conscious publication was quite the honour.

Sunday, February 21, 2010

HDR show and lecture in Victoria, BC


An attendee to my HDR show last August asked me to come to Victoria and do a "Show and Tell". I plan to discuss my thoughts on image capture, the option for HDR photography, and examples of my work showing both the original images and the final HDR processed image. It is a free event in a delightful theatre setting. Come and enjoy.

Toby


Location:
Eric Martin Pavilion
1900 block of Fort Street
Entrance: Corner of Fort St. at Lee Ave.
Victoria, BC.

Details:
March 20th
7-8:30 pm
No charge
For more information contact me or:
Bruce Saunders 250 595-3542
bruces@islandnet.com

Tuesday, February 16, 2010

Back-lighting an image - the whys and hows.

There are key elements that make a picture a piece of memorable art. Obviously you need an interesting subject. Secondly, you need to fame it in a way that invites the eye to move all about he image using the rule of thirds as a reference (the rule of third blog to follow soon). The next most important element is lighting. Think of light as "painting" your image.


In the old days, the Kodak Guide to Photography suggested having the sun behind you coming from you left or right shoulder.


The image above is a good example of how frontal lighting creates a bright, full colour image. Having the light source, as in this example, to the left create delightful shadow detail making the image quite inviting. It is a fine image shot in a convention manner.


Here is another example. Front lighting is important in this case as the subject is both the vessel as well as the person taking its picture. You want to display lots of information - information painted with the frontal lighting. It would not work as a silhouette. 

Now, what would happen if you placed the light source in front of the camera requiring you to shoot into the sun. Your first consideration is "what is the subject?" Is it the graphics of the image or is it detail in the image?

With the following image it is the graphics. When I arrived at the location I noticed that the tall ship was delightfully outlined by the sun that was low in the sky. As well, both the vessel and the people and artifact on the dock created very intriguing shadows. 


The image above is what I saw. To me it is a stunning. Actually, this was shot as a project for the metroblenznewsquad and was subsequently published in the Metro, a vancouver daily newspaper. I guess it worked.

Now, what makes this picture work. First, the sun was low in the sky resulting in a blue sky and great shadows. Secondly, I placed the sun behind one of the boat structures making the vessel the subject, not the sun. Thirdly, the vessel, though the subject, is only 1/2 of the picture. Your eye is drawn to the ship then drawn to the shadows on the dock, then back to the vessel. It is a very dynamic image ... dynamic meaning the eye is invited to move about the image.


You can also back-light quite effectively with the sun in the image. This is what I did with the above image. It is the same subject however the sun is an important element. Having the sun as a part of the picture creates three focuses of interest: the vessel, the sky, and the sun. The city skyline is so small that I didn't consider it more than the horizon.

So, there you have it. Don't give up taking picture in the old "Kodak" fashion. However, start experimenting and get that light source in front of you.

E-mail me if you have any thought or questions.

Get out there and record some life.


Thursday, February 11, 2010

Street Photography: The Olympic Venue


It was a delight to be asked to volunteer my time for the Metro/Blenz New Squad team. It brought back memories of shooting for the North Shore Weekender in the '80s.
MetroBlenz goal is not to cover the Olympic events, rather to cover the social psychology surrounding it. The squad is a made up of a group of people from all walks of life and backgrounds that want to share their experiences using various forms of digital media. My challenge as a photographer was to capture the social life visually.
If you ever want to be a photojournalist, this type of volunteering is phenomenal experience. As opposed to sooting commercially (being contracted to capture a specific image), this is "no risk", "no pressure" shooting. If you like something you see, you post it or submit it to a local media centre. All you need to be is relaxed, keep you eyes open, and have the courage to interview if people are in your image. Here are some examples of what I did on my first day on "unofficial" assignment.

Walking to my first meeting with the news team, I noticed that Vancouver traffic was unusually quite? So, when the little traffic that was there was gone, I went into the middle of the street and shot this picture. The goal was to dramatize the lack of traffic - lots of tarmac, include the city, and including the surrounding buildings to provide context. Here is the picture with the story.

Later in my walk I noticed a busker on Granville. I took his picture so he was dominant, included the his guitar case with coins in it, and made sure there were people walking by. I took lots of pictures and chose the one where the man was looking into the guitar case - drawing your attention there - and the the woman was smiling at the busker - drawing your attention back to him. I did interview him and got permission from him prior to taking his picture. I also got some background on him as a busker and performer. You have to do this if you want to be a photojournalist. Here is the picture with the story.

Here are the other images I took yesterday:


So, if you want to be a photojournalist, get out in your community and start shooting pictures. Start you own blog. Take your best images, adding a "cut line" (what is said at the bottom of the picture to give the picture interest) and submit it to a local paper or community website. Not only will will you grow as a photographer, you will get lots of exercise. Good luck.

Tuesday, February 9, 2010

Shooting from the Hip: The Photo Sleuth.


Enroute to California.

You can't always setup your shots. Putting your camera to your eye is a dead giveaway that attracts attention. Some situations require the photo "sleuth" in you. This day was one of those situation.

We are on our annual trip to California. We stop in Roseburg for lunch on our way. Roseburg is typical small town in America struggling through the recession. Being right on Interstate 5, a highway that can take you from the Canadian to the Mexican border, it is filled with transient hotels (e.g. Motel 6) and marginal eating venues. Denny's is one of them. However, as generic as Denny's Restaurants are (same menu different waitress) the customers tend to reflect the character of the area. This day was no exception. As we enter I see "Tex", a quintessential urban cowboy, all by himself having his fried and probably somewhat dry chicken (by the way, that is why you get the dipping sauce). He was alone at the counter, a place where you can at least chat with the staff, cowboy hat still on, long carefree hair, leather jacket and cowboy boots. Though I wasn't expecting it, a picture was before my eyes. I just love this stuff. I decide to capture the image. However it was going to have to be one of those "shoot from the hip" images. I returned to my car, grabbed my Canon Rebel (unfortunately only 6 MP and captured in jpg). I set the zoom at wide angle to ensure I would capture the "context" - the surroundings that contexualize the situation. Then, walking in, I shot one image form the hip. Yes, I stole an image. No one knew but me. His face was such that his identity was protected (mind you, the hat and hair would be a giveaway to the locals). This is the result. A sweet memory for me. I never did meet him, however, now immortalized.

So, keep you eyes open. Practice shooting from the hip. Use different focal lengths. I recommend 35-28 mm on a standard full frame SLR. If you are using a point-and-shoot, set it on its widest angle. Practice to that when a situation arrives, you will be ready.

Sunday, February 7, 2010

Make it a Portrait


How often do we take snapshot of people that matter to us - just a quick "snapshot". We take the picture because these people are important to us. Well, why not make it into a portrait?

A portrait is a painting, photograph, sculpture, or other artistic representation of a person, in which the face and its expression is predominant (Wikipedia).

Well, it doesn't just have to be the face, rather, the face has to be significant. The face - the look - displays an aspect of the personality. However, where you take the picture and the artifacts in the picture should make a statement about the individual.

Here is an example - Victor: a dear friend who is slowly losing cognitive functioning. At 81 Victor still recognizes me however has a hard time remembering last years visit (I see him once a year due to travel) or this morning’s conversation. But he has not lost his sense of humor or his ability to play the piano – he volunteers at a senior’s home where he plays 50’s music for his contemporaries. He is a dear friend, and is very important to me.

This was taken 2 day ago … sitting in his living room just before I asked him to play for us. Not sure how long he will be with us, I decide to get out the tripod and my Nikon and capture a sweet moment. I posed him in a way that reflects his character … the humorous stern face, the glass of wine, the incandescent light used to read his New York Times each day. This is Victor - not a snapshot, rather a portrait.

The next time you are with someone who is important to you, give it some thought. Who are they? What matters to them? What of them matters to you? What makes them unique. Ask them if you can take their picture. Once they agree most people don't mind to be directed. If they get tense, play with them. Make them at ease. Use a tripod. This enabling you to interact with me knowing the camera is set-up for the picture you want. As with Victor, when the moment arrives, take your "portrait".

Good luck.

Saturday, February 6, 2010

Looking for Images - be Flexible.


How often do you go on a hunt for image? It is a regular activity for me. Studio photographers create their image, the rest of us have to find them.

I often head out with an idea of what I am looking for - macro, landscape, architecture, whatever. I make sure I take the appropriate lenses sometime restricting my selection in order focus my attention. But sometimes I just go on a hunt taking with me my 17-200 and 12-44.

Today I went to an old building in Portland expecting to find delightful old architectural structures. Unfortunately, the building had been renovated and everything was quite "modern". As I toured the building I changed my focus from the "old" to the "new". I started looking for graphic designs. I could hardly listen to the tour guide's description of the history and renovation of the property as my eyes feasted on lines and shapes. As we descended to the bowels of the building, we walked down winding staircases framed in stainless steel, built around recycled wood floor and lit with "contrasy" tungsten lights. Here is what I came up with - something I never expected from an 120 year-old building.

The point of this is: keep an open mind when your initial photographic goals are not met.