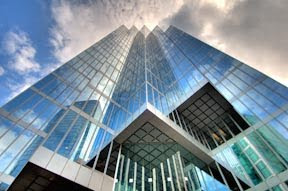
HDR, or high dynamic range imaging or picture capture is a set of techniques that results in the photographer being able to record and display a greater dynamic range of luminance or light. Essentially, your pictures come alive with brilliant highlights and lots of information in the shadows.
This is accomplished by taking numerous pictures of the same scene but at different exposures. For example, you would take the first picture with the camera’s light meter indicating a proper exposure. Keeping the camera steady (normally while on a tripod) you would take a series of captures of the same scene over and under exposing the image. With advanced SLR cameras (I use a Nikon d-300) this is easily accomplished by using the “auto-bracket” mode. With this setting, the camera makes all the adjustments for you. If you have your camera on continuous shoot mode, the exposures can be captured in about a second or two. (My camera captures 7 images/second.) Make sure the camera is on aperture priority to prevent changes in depth of field. I will talk about this later, however, as the iris opens up, the depth of field becomes shallower and you do not want the depth of field to change. Let the shutter alter the exposure.
You can learn more about the technical side of HDR photography from Blake Rudis
Here (above) is an example of one of my first HDR images
- CIBC building, Vancouver, BC.
It was the middle of a working day and I didn’t have a tripod. Here was my sequence:
I visualized the potential image and decided what lens I needed to use, how many exposures would be required, and what ASA setting I would need to ensure my slowest exposure would not result in camera shake.
Then I set my camera on aperture mode, ISO 200, 7 brackets, continuous exposure, put on my wide angle Nikon d12-24 and set it at 12mm. The point here is to be prepared well before your shot.
I placed myself just in front of the entrance where I could get a good tight image of the building with lots of parallax. Parallax is when a square or rectangular building looks wider at the bottom than the top. That was the look I wanted. HDR or not, your image must be a well crafted - framed properly, only relevant information in the frame (no heads of the people walking past me), and the information (subject of the image) arranged in an interesting fashion.
I took a deep breath, held it, planted my shoulders on my chest to stabilize my arms and camera (essentially making myself into a tripod), then took the 7 images in one second. I only used 6 of the images - you only need to use enough images that capture both the highlight (
sky) and shadow (awning)
information. Below are two of the images - the first one (1/6) captured the shadow detail and the other one (6/6) captured the highlight detail.
Back home I used Photomatix to process the images using their “tonal mapping” controls to shape the image the way I wanted others to see it. There you go and here is the result (top right0.
There is much more to HDR than what I have reviewed. Do check out Blake’s site for the nitty gritty of this advance in digital photography.
About the Images.
The first image is 6 stop different from the one below it. In all, I took 6 captures one stop apart. Notice how the sky is washed out in the first one and the awning is totally black in the other image. HDR software layers all the images and allows you to integrate information into one stunning image.


Amazing...... what technology can create.....
ReplyDeleteThanks Elaine ... a little late on this but much appreciated.
Delete